先日書いた記事『カメラアプリにFacebookへの写真投稿機能をつける』では、SDKのダウンロードから、OAuth認証の実装方法、画像投稿APIのたたき方、まで書きました。
その後『EncountMe』でもFacebook対応することになり、プロフィールの取得や近況の投稿などを実装したので、そのやり方などを書いておきます。
準備
- 先日の記事の通りに認証を済ませておきます。permissionsにはuser_about_me、publish_streamを設定します。
NSArray *permissions = [NSArray arrayWithObjects:@"user_about_me",
						@"publish_stream",nil];

[appDelegate.facebook authorize:permissions delegate:self];
- ヘッダで
への準拠を宣言し、レスポンス受信時、成功時、失敗時のデリゲートメソッドを実装しておきます。
- (void)request:(FBRequest *)request didReceiveResponse:(NSURLResponse *)response {
	NSLog(@"received response");
}

- (void)request:(FBRequest *)request didLoad:(id)result {
	if ([result isKindOfClass:[NSArray class]]) {
		result = [result objectAtIndex:0];
	}
	NSLog(@"result:%@",result);
};

- (void)request:(FBRequest *)request didFailWithError:(NSError *)error {
	NSLog(@"error:%@", [error localizedDescription]);
};
プロフィールの基本データを取得する
[facebook requestWithGraphPath:@"me" andDelegate:self];
※facebookというのはFacebook iOS SDKのFacebookクラスのインスタンスです。(詳しくは先日の記事をご参照ください)
(実行結果)
result:{
    education =     (
                {
            school =             {
                id = {xxx};
                name = {xxx};
            };
            type = College;
        }
    );
    "first_name" = {xxx};
    gender = male;
    id = {xxx};
    "last_name" = {xxx};
    link = "http://www.facebook.com/profile.php?id=100000563263951";
    locale = "ja_JP";
    name = "\U5824\U4fee\U4e00";
    timezone = 9;
    "updated_time" = "2010-12-31T06:00:26+0000";
    verified = 1;
    work =     (
                {
            employer =             {
                id = 100460806674287;
                name = "\U30ab\U30e4\U30c3\U30af";
            };
            "start_date" = "2010-02";
        }
    );
}
fqlを用いてユーザーデータを取得する
Facebook SDK内のデモにあったもの。下記コードではfqlを使って、userテーブルからuidとnameを取得しています。
NSMutableDictionary * params = [NSMutableDictionary dictionaryWithObjectsAndKeys:
		@"SELECT uid,name FROM user WHERE uid=4", @"query",nil];
[facebook requestWithMethodName:@"fql.query"
					   andParams:params
				   andHttpMethod:@"POST"
					 andDelegate:self];
(実行結果)
result:{
    name = "Mark Zuckerberg";
    uid = 4;
}
fqlのリファレンスはこちら
http://developers.facebook.com/docs/reference/fql/
userテーブルにどんなカラムがあるかはこちらから調べられます。
http://developers.facebook.com/docs/reference/fql/user/
投稿(ダイアログあり)
ヘッダでFBDialogDelegateへの準拠を宣言し、完了時のデリゲートメソッドを実装しておきます。
- (void)dialogDidComplete:(FBDialog *)dialog {
	NSLog(@"publish successfully");
}
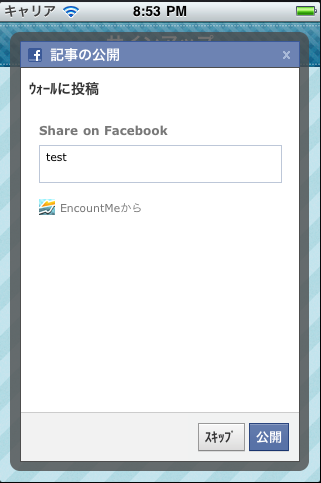
下記のようにdialog:メソッドを実行すると、
NSMutableDictionary* params = [NSMutableDictionary dictionaryWithObjectsAndKeys:
	@"Share on Facebook",  @"user_message_prompt",nil];

[facebook dialog:@"feed"
		andParams:params
	  andDelegate:self];
paramsに"user_message_prompt"というキーで渡した内容がテキストフィールド上部に表示されています。
投稿(ダイアログなし)
ダイアログを出さず、アプリが決めたテキストを投稿する場合は下記のようになります。
NSMutableDictionary* params = [NSMutableDictionary dictionaryWithObjectsAndKeys:
						   @"this is auto post", @"message",
						   nil];

[facebook requestWithMethodName:@"stream.publish"
							  andParams:params
						  andHttpMethod:@"POST"
							andDelegate:self];
こちらを実行すると、
こんな感じで投稿されます。

