Animations tutorial
This tutorial shows you how to build explicit animations in Flutter. The examples build on each other, introducing you to different aspects of the animation library. The tutorial is built on essential concepts, classes, and methods in the animation library that you can learn about in Introduction to animations.
The Flutter SDK also provides built-in explicit animations, such as FadeTransition, SizeTransition, and SlideTransition. These simple animations are triggered by setting a beginning and ending point. They are simpler to implement than custom explicit animations, which are described here.
The following sections walks you through several animation examples. Each section provides a link to the source code for that example.
Rendering animations
#So far you've learned how to generate a sequence of numbers over time. Nothing has been rendered to the screen. To render with an Animation object, store the Animation object as a member of your widget, then use its value to decide how to draw.
Consider the following app that draws the Flutter logo without animation:
import 'package:flutter/material.dart';

void main() => runApp(const LogoApp());

class LogoApp extends StatefulWidget {
  const LogoApp({super.key});

  @override
  State<LogoApp> createState() => _LogoAppState();
}

class _LogoAppState extends State<LogoApp> {
  @override
  Widget build(BuildContext context) {
    return Center(
      child: Container(
        margin: const EdgeInsets.symmetric(vertical: 10),
        height: 300,
        width: 300,
        child: const FlutterLogo(),
      ),
    );
  }
}
App source: animate0
The following shows the same code modified to animate the logo to grow from nothing to full size. When defining an AnimationController, you must pass in a vsync object. The vsync parameter is described in the AnimationController section.
The changes from the non-animated example are highlighted:
class _LogoAppState extends State<LogoApp> {
class _LogoAppState extends State<LogoApp> with SingleTickerProviderStateMixin {
  late Animation<double> animation;
  late AnimationController controller;

  @override
  void initState() {
    super.initState();
    controller =
        AnimationController(duration: const Duration(seconds: 2), vsync: this);
    animation = Tween<double>(begin: 0, end: 300).animate(controller)
      ..addListener(() {
        setState(() {
          // The state that has changed here is the animation object's value.
        });
      });
    controller.forward();
  }

  @override
  Widget build(BuildContext context) {
    return Center(
      child: Container(
        margin: const EdgeInsets.symmetric(vertical: 10),
        height: 300,
        width: 300,
        height: animation.value,
        width: animation.value,
        child: const FlutterLogo(),
      ),
    );
  }

  @override
  void dispose() {
    controller.dispose();
    super.dispose();
  }
}
App source: animate1
The addListener() function calls setState(), so every time the Animation generates a new number, the current frame is marked dirty, which forces build() to be called again. In build(), the container changes size because its height and width now use animation.value instead of a hardcoded value. Dispose of the controller when the State object is discarded to prevent memory leaks.
With these few changes, you've created your first animation in Flutter!
Simplifying with AnimatedWidget
#The AnimatedWidget base class allows you to separate out the core widget code from the animation code. AnimatedWidget doesn't need to maintain a State object to hold the animation. Add the following AnimatedLogo class:
class AnimatedLogo extends AnimatedWidget {
  const AnimatedLogo({super.key, required Animation<double> animation})
      : super(listenable: animation);

  @override
  Widget build(BuildContext context) {
    final animation = listenable as Animation<double>;
    return Center(
      child: Container(
        margin: const EdgeInsets.symmetric(vertical: 10),
        height: animation.value,
        width: animation.value,
        child: const FlutterLogo(),
      ),
    );
  }
}
AnimatedLogo uses the current value of the animation when drawing itself.
The LogoApp still manages the AnimationController and the Tween, and it passes the Animation object to AnimatedLogo:
void main() => runApp(const LogoApp());

class AnimatedLogo extends AnimatedWidget {
  const AnimatedLogo({super.key, required Animation<double> animation})
      : super(listenable: animation);

  @override
  Widget build(BuildContext context) {
    final animation = listenable as Animation<double>;
    return Center(
      child: Container(
        margin: const EdgeInsets.symmetric(vertical: 10),
        height: animation.value,
        width: animation.value,
        child: const FlutterLogo(),
      ),
    );
  }
}

class LogoApp extends StatefulWidget {
  // ...

  @override
  void initState() {
    super.initState();
    controller =
        AnimationController(duration: const Duration(seconds: 2), vsync: this);
    animation = Tween<double>(begin: 0, end: 300).animate(controller)
      ..addListener(() {
        setState(() {
          // The state that has changed here is the animation object's value.
        });
      });
    animation = Tween<double>(begin: 0, end: 300).animate(controller);
    controller.forward();
  }

  @override
  Widget build(BuildContext context) {
    return Center(
      child: Container(
        margin: const EdgeInsets.symmetric(vertical: 10),
        height: animation.value,
        width: animation.value,
        child: const FlutterLogo(),
      ),
    );
  }
  Widget build(BuildContext context) => AnimatedLogo(animation: animation);

  // ...
}
App source: animate2
Monitoring the progress of the animation
#It's often helpful to know when an animation changes state, such as finishing, moving forward, or reversing. You can get notifications for this with addStatusListener(). The following code modifies the previous example so that it listens for a state change and prints an update. The highlighted line shows the change:
class _LogoAppState extends State<LogoApp> with SingleTickerProviderStateMixin {
  late Animation<double> animation;
  late AnimationController controller;

  @override
  void initState() {
    super.initState();
    controller =
        AnimationController(duration: const Duration(seconds: 2), vsync: this);
    animation = Tween<double>(begin: 0, end: 300).animate(controller)
      ..addStatusListener((status) => print('$status'));
    controller.forward();
  }
  // ...
}
Running this code produces this output:
AnimationStatus.forward
AnimationStatus.completed
Next, use addStatusListener() to reverse the animation at the beginning or the end. This creates a "breathing" effect:
void initState() {
  super.initState();
  controller =
      AnimationController(duration: const Duration(seconds: 2), vsync: this);
  animation = Tween<double>(begin: 0, end: 300).animate(controller);
  animation = Tween<double>(begin: 0, end: 300).animate(controller)
    ..addStatusListener((status) {
      if (status == AnimationStatus.completed) {
        controller.reverse();
      } else if (status == AnimationStatus.dismissed) {
        controller.forward();
      }
    })
    ..addStatusListener((status) => print('$status'));
  controller.forward();
}
App source: animate3
Refactoring with AnimatedBuilder
#One problem with the code in the animate3 example, is that changing the animation required changing the widget that renders the logo. A better solution is to separate responsibilities into different classes:
- Render the logo
- Define the
Animationobject - Render the transition
You can accomplish this separation with the help of the AnimatedBuilder class. An AnimatedBuilder is a separate class in the render tree. Like AnimatedWidget, AnimatedBuilder automatically listens to notifications from the Animation object, and marks the widget tree dirty as necessary, so you don't need to call addListener().
The widget tree for the animate4 example looks like this:
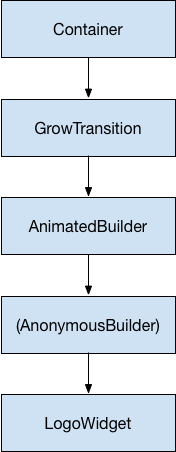
Starting from the bottom of the widget tree, the code for rendering the logo is straightforward:
class LogoWidget extends StatelessWidget {
  const LogoWidget({super.key});

  // Leave out the height and width so it fills the animating parent.
  @override
  Widget build(BuildContext context) {
    return Container(
      margin: const EdgeInsets.symmetric(vertical: 10),
      child: const FlutterLogo(),
    );
  }
}
The middle three blocks in the diagram are all created in the build() method in GrowTransition, shown below. The GrowTransition widget itself is stateless and holds the set of final variables necessary to define the transition animation. The build() function creates and returns the AnimatedBuilder, which takes the (Anonymous builder) method and the LogoWidget object as parameters. The work of rendering the transition actually happens in the (Anonymous builder) method, which creates a Container of the appropriate size to force the LogoWidget to shrink to fit.
One tricky point in the code below is that the child looks like it's specified twice. What's happening is that the outer reference of child is passed to AnimatedBuilder, which passes it to the anonymous closure, which then uses that object as its child. The net result is that the AnimatedBuilder is inserted in between the two widgets in the render tree.
class GrowTransition extends StatelessWidget {
  const GrowTransition({
    required this.child,
    required this.animation,
    super.key,
  });

  final Widget child;
  final Animation<double> animation;

  @override
  Widget build(BuildContext context) {
    return Center(
      child: AnimatedBuilder(
        animation: animation,
        builder: (context, child) {
          return SizedBox(
            height: animation.value,
            width: animation.value,
            child: child,
          );
        },
        child: child,
      ),
    );
  }
}
Finally, the code to initialize the animation looks very similar to the animate2 example. The initState() method creates an AnimationController and a Tween, then binds them with animate(). The magic happens in the build() method, which returns a GrowTransition object with a LogoWidget as a child, and an animation object to drive the transition. These are the three elements listed in the bullet points above.
void main() => runApp(const LogoApp());

class LogoWidget extends StatelessWidget {
  const LogoWidget({super.key});

  // Leave out the height and width so it fills the animating parent.
  @override
  Widget build(BuildContext context) {
    return Container(
      margin: const EdgeInsets.symmetric(vertical: 10),
      child: const FlutterLogo(),
    );
  }
}

class GrowTransition extends StatelessWidget {
  const GrowTransition({
    required this.child,
    required this.animation,
    super.key,
  });

  final Widget child;
  final Animation<double> animation;

  @override
  Widget build(BuildContext context) {
    final animation = listenable as Animation<double>;
    return Center(
      child: Container(
        margin: const EdgeInsets.symmetric(vertical: 10),
        height: animation.value,
        width: animation.value,
        child: const FlutterLogo(),
      child: AnimatedBuilder(
        animation: animation,
        builder: (context, child) {
          return SizedBox(
            height: animation.value,
            width: animation.value,
            child: child,
          );
        },
        child: child,
      ),
    );
  }
}

class LogoApp extends StatefulWidget {
  // ...

  @override
  Widget build(BuildContext context) => AnimatedLogo(animation: animation);
  Widget build(BuildContext context) {
    return GrowTransition(
      animation: animation,
      child: const LogoWidget(),
    );
  }

  // ...
}
App source: animate4
Simultaneous animations
#In this section, you'll build on the example from monitoring the progress of the animation (animate3), which used AnimatedWidget to animate in and out continuously. Consider the case where you want to animate in and out while the opacity animates from transparent to opaque.
Each tween manages an aspect of the animation. For example:
controller =
    AnimationController(duration: const Duration(seconds: 2), vsync: this);
sizeAnimation = Tween<double>(begin: 0, end: 300).animate(controller);
opacityAnimation = Tween<double>(begin: 0.1, end: 1).animate(controller);
You can get the size with sizeAnimation.value and the opacity with opacityAnimation.value, but the constructor for AnimatedWidget only takes a single Animation object. To solve this problem, the example creates its own Tween objects and explicitly calculates the values.
Change AnimatedLogo to encapsulate its own Tween objects, and its build() method calls Tween.evaluate() on the parent's animation object to calculate the required size and opacity values. The following code shows the changes with highlights:
class AnimatedLogo extends AnimatedWidget {
  const AnimatedLogo({super.key, required Animation<double> animation})
      : super(listenable: animation);

  // Make the Tweens static because they don't change.
  static final _opacityTween = Tween<double>(begin: 0.1, end: 1);
  static final _sizeTween = Tween<double>(begin: 0, end: 300);

  @override
  Widget build(BuildContext context) {
    final animation = listenable as Animation<double>;
    return Center(
      child: Opacity(
        opacity: _opacityTween.evaluate(animation),
        child: Container(
          margin: const EdgeInsets.symmetric(vertical: 10),
          height: _sizeTween.evaluate(animation),
          width: _sizeTween.evaluate(animation),
          child: const FlutterLogo(),
        ),
      ),
    );
  }
}

class LogoApp extends StatefulWidget {
  const LogoApp({super.key});

  @override
  State<LogoApp> createState() => _LogoAppState();
}

class _LogoAppState extends State<LogoApp> with SingleTickerProviderStateMixin {
  late Animation<double> animation;
  late AnimationController controller;

  @override
  void initState() {
    super.initState();
    controller =
        AnimationController(duration: const Duration(seconds: 2), vsync: this);
    animation = CurvedAnimation(parent: controller, curve: Curves.easeIn)
      ..addStatusListener((status) {
        if (status == AnimationStatus.completed) {
          controller.reverse();
        } else if (status == AnimationStatus.dismissed) {
          controller.forward();
        }
      });
    controller.forward();
  }

  @override
  Widget build(BuildContext context) => AnimatedLogo(animation: animation);

  @override
  void dispose() {
    controller.dispose();
    super.dispose();
  }
}
App source: animate5 object knows the current state of an animation (for example, whether it's started, stopped, or moving forward or in reverse), but doesn't know anything about what appears onscreen.
- An
AnimationControllermanages theAnimation. - A
CurvedAnimationdefines progression as a non-linear curve. - A
Tweeninterpolates between the range of data as used by the object be
Next steps
#This tutorial gives you a foundation for creating animations in Flutter using Tweens, but there are many other classes to explore. You might investigate the specialized Tween classes, animations specific to your design system type, ReverseAnimation, shared element transitions (also known as Hero animations), physics simulations and fling() methods.
Unless stated otherwise, the documentation on this site reflects the latest stable version of Flutter. Page last updated on 2025-01-31. View source or report an issue.