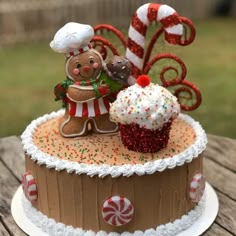
As requested several times, my hot cocoa tutorial! My best seller, and a favorite thing to make this time of year:) 🎄🍫☕️☃️ | By Christy's | Hey, guys. It's Christy coming to you with one of my most requested tutorials and this is the hot cocoa that I make. Every year, it's it's my best seller during the season and right now, I'm showing you how to make the dripping inside of the cup that we're going to be doing. So, I would just take some Modge Podge there and use some dark chocolate paint, acrylic paint. The one I'm using is melting chocolate and I just have a little bit mixed up here. This is the bowl that I usually have. You know, I mix up a so that I have some for the next time but I'm running low so I'm just showing you how I do it and so you're just going to take your cup that's obviously this cup is all dried and done already but I'm just showing you how it looks how it's supposed to look when you're done so I'm just taking a Popsicle stick and I'm just bringing it on the inside and then just letting it drip down just let it naturally drip down you don't have to like turn the cup or anything like that and you can put in as much or as little as you want. So with this step you are going to do this and then leave this dry overnight. There's a couple different steps to this tutorial. Now it's all dry. It's the next day. And now I'm showing you how I use my spackle. This is Red Devil one time lightweight spackle. And I'm using the same paint to mix with the spackle. And it's a little bit lighter now than the dripping and you can actually do it even lighter than that or you could do like a white spackle inside and then just have the chocolate dripping down but this is more like a hot cocoa and that's what I wanted to show you how to do So I'm just covering all the sides and excuse me. You want to make sure you don't have any spots showing through and what I do here is I just take a paint brush and I'm just trying to get the bottom covered really well. You just want to make sure there's nothing showing from the outside and the paint brush just kind of you know gets the excess off as you're getting it all covered. I just bring the paint brush all the way up on all the sides and make sure I don't have any excess spackle that is not need because you do not want to make this super thick. You want a thinner coat on the inside. So now you're going to wait and let this dry overnight. So this will be your second night. And now I'm just using the cardboard. I cut out a circle for the top of the cup. And I'm just hot gluing it on. So the next step we're going to do is the dripping. So you want to do this next. You don't want to have to do the dripping after your topper's on. So I'm just using some sprinkles called hot cocoa by Sue with the Primitive Pumpkin on Itsy. And they're appropriate sprinkles because there's chocolate and there are cinnamon sticks in there and peppermints. It's a really cute mix and there's a ton of snowflakes. All different sizes. And now I didn't want to go overboard on the dripping because we already have the chocolate dripping. But I just wanted to have a little bit of a white coming down. So I'm not covering up you know a lot of the chocolate. And there are some really big pieces of like a peppermint. And then I'm just putting a couple of those on. And you don't want to go overboard because with that fabric paint that I put on it will continually drop down if if there's too many sprinkles. And if you want to know what tool I'm using, it's just a wax tool for diamond art. And I got it on Amazon but you can find them just about anywhere. And I just use it for sprinkles. It works really well. Now, I'm putting on some chunky glitter by Primitive Pumpkin on Itsy and I just like to put a little shimmer on that while it's still wet And now I'm taking half of a styrofoam ball. Hot gluing it on on the low temp. And that is a two and a half inch ball. It just helps to take the place of spackle so you're not using so much of it. So I'm putting the spackle now. That same speckle inside my piping bag with a one M tip. Also I do add white paint to the speckle to make it a little less dry. So what I do is I just put a big amount of spackle into a Tupperware container and then I just add my white paint, my acrylic paint and just mix it up. The spackle I get is from Amazon. It is $25 right now for a gallon. But if you don't want to buy that much or you want to have a smaller amount. You could get the smaller sizes like at Home Depot and Lowe's. Uh Walmart I believe has a smaller a smaller container but it's not Red Devil and also Dollar Tree has little buckets of spackle too but you would need quite a bit for this project. So now I'm taking a snowman from the Dollar Tree and I'm just putting some toothpicks in the bottom of it so that it can adhere to the Styrofoam ball in the center and I'm just cutting this candy cane to make it a little bit smaller and that candy cane is also from the Dollar Tree. So it's kind of a budget friendly little project. Now I'm taking a skewer and I'm going to be putting in my straws. So the skewers are going to go right into the Styrofoam ball. Putting a little bit of hot glue inside each straw. Also I'd like to put the chunky glitter on before I decorate the whole thing because I don't want that chunky glitter on all of my little embellishments. Sometimes people put it put it on last. I just put it on beforehand. So now I'm just taking a snowflake from the Dollar Tree and just cutting it in half. And I'm going to position it where I think it should go. You can put a whole one into. I just I just like to have two halves in different areas. And be careful when you're working with this because of the dripping and the white dripping coming down. Just be mindful that it's there. Sometimes I bump into it. And I'm just taking a little fake peppermint candy from Hobby Lobby. Also putting in a toothpick so it adheres better. And now I just made some marshmallows out of white clay. And of course we have to have that for our hot cocoa. Again, more toothpaste. Okay in that sign that little let it snow sign is from Itsy. I'm not sure which shop it was. I had those from last year. And to make it more sturdy, I did put the toothpick on the back and glued that in. And there's another peppermint from Hobby Lobby. And I got some candy cavachons from Itsy. Again, I'm not sure where I have had a lot of this stuff last year and the year before. And now I'm just taking some little mittens. They're sprinkle mittens. And I'm just going to set them into the the spackle. Where it needs a little color. Adding a peppermint stick there. And more mittens. They're really cute. They come in blue too. I want to say play code three for those but I'm not sure. And adding some more candies in the back. You gotta finish up the back. Especially if it's going to be used like as a centerpiece. You want it decorated all the way around. And I had those little ornaments from Hobby Lobby as well. And I'm just adding some of the mittens in the back there. And one of the last steps is adding the dripping, the chocolate dripping and that is a dark brown puffy paint from Amazon. Also Hobby Lobby carries it to it. Well so does Walmart and any craft store. This is the dark brown. And I'm just dripping it down on the marshmallows and I'm just going to add just a couple snowflakes to the chocolate. I'm adding in a couple more peppermint sprinkles to the bare spots and it's almost done and the last thing we're going to need is a bow and I'm just using some ribbon from Dollar Tree. It has the snowflakes on them. And I'm going to make a four loop bow. And then I'm just taking some wire wrapping it around and tightening it and then I will be putting that right on the side of the glass there and I'm going to use the wire in the back to push through the speckle I'm debating which side it looks better. So I picked that side and I'm just pushing it through the spackle with that while you're in the back. And then I'm just taking a little fake snowball and putting that in the center of the bowl. And there we have it. I hope you guys enjoyed it and I'd love to see if you guys make one and if this inspires you. We will see you on the next one. Thanks for watching. Bye.
As requested several times, my hot cocoa tutorial! My best seller, and a favorite thing to make this time of year:) 🎄🍫☕️☃️ | By Christy's Faux Confections | Hey, guys. It's Christy coming to you with one of my most requested tutorials and this is the hot cocoa that I make. Every year, it's it's my best seller during the season and right now, I'm showing you how to make the dripping inside of the cup that we're going to be doing. So, I would just take some Modge Podge there and use some dark chocolate paint, acrylic paint. The one I'm using is melting chocolate and I just have a little bit mixed up here. This is the bowl that I usually have. You know, I mix up a so that I have some for the next time but I'm running low so I'm just showing you how I do it and so you're just going to take y


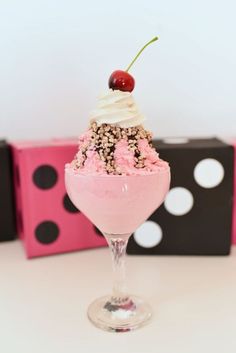
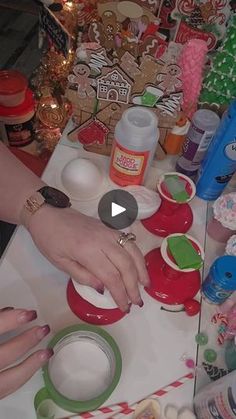
Who likes frozen Margaritas? well tonight I am making a fake frozen margarita 😃 #margarita #margaritas #fakemargarita #fakedrinks #cincodemayo #thebeach... | By Pam's Craft Boutique | Hey everybody. I hope you had a great Thanksgiving. Tonight we are going to make a fake margarita. These margarita cups. I got it the Dollar General like over the summer. And they've just been sitting here staring at me so I thought we would make a frozen margarita. So in that bag is some sand. And I'm just painting Mod Podge around the rim and I'm going to put that sand on there so that it gives it a salt look. Um there you could probably use like epsom salt if you wanted to. But the sand is what I had here at my disposal so I just grabbed it and that's what I used. And it does give kind of that salty look. And yeah so let's just go for it. Now I'm using epoxy resin. You use one part A, one part B. Now my A is a little thick. I think it got too cold in my building last night. And it's a little thick but but it worked and I made it work so it was right at the end anyway and so I'm going to use it and so I used one part that was the A and now we're going to pour the B and the B has to be the equal amounts alright so that it will set up properly and then once you get your A and your B measured equally we're going to transfer into this cup here now these are going to be frozen margaritas And so I need to mix A and B in this one red cup. Okay? And then I got these little cactus cups too. Like little shot cups at the Dollar General as well. So but I only have enough resin to make one. So I'm going to make one of the little cactus drinks in one margarita until I can get some more resin. So this is resin colorant that you get from Hobby Lobby. It is a concentrate. It does not take much. I mean just a little I don't want it to be stark yellow like I just want it to have like a hint of color to give it that frozen margarita look and so I'mma get that all mixed together and once I add my mixture to it to give it the frozen margarita look it kind of lightens that color too so keep that in mind if you're making these and now my mixture this is my concoction that I make. It's a diaper and water mixed together to get like a jelly concoction and now I'm just putting it into my resin mixture and I'm going to mix it up really well and that will give it the frozen look, okay? And it's kind of like ooey and it's okay. That's the way it's supposed to be. So, if yours is all ooey and gooey, you're doing the right thing. This is how I like mine. So, let let's just say that. That's this is how I like mine. So, if that's what yours is doing, then, you are good to go. So taking the margarita margarita cup that we put our fake salt around. I'm just going to pour it into this margarita cup here. And I like to do a little bit at a time. So if there's like any air pockets or anything like that I kind of just work them out. And then I don't fill it all the way up to the top. I get it almost though. Pretty close. But I want to save some of that mixture for the little cactus drink. And then now on the bottom it was still kind of liquidy. So I just added some more diaper mixture to to get into so it wasn't so runny. And now I'm just going to pour this into my cactus drink here. And then I'm going to add a straw to the little shot drink and the margarita and then a fake plastic lime. You can get these on Amazon. If you would like a link let me know. And I'll post it for you. Um comment in the comments below and I'll get you that. So and that is it guys and you have a fake margarita. So I hope y'all enjoy this video. I hope y'all had a great holiday. I appreciate you being here and watching my videos. If y'all have any questions, post them in the comments below. And I will get back to you and I hope y'all have a great evening. Thanks for watching and I'll see you in the next video.
Who likes frozen Margaritas? well tonight I am making a fake frozen margarita 😃 #margarita #margaritas #fakemargarita #fakedrinks #cincodemayo #thebeach... | By Pam's Craft Boutique | Hey everybody. I hope you had a great Thanksgiving. Tonight we are going to make a fake margarita. These margarita cups. I got it the Dollar General like over the summer. And they've just been sitting here staring at me so I thought we would make a frozen margarita. So in that bag is some sand. And I'm just painting Mod Podge around the rim and I'm going to put that sand on there so that it gives it a salt look. Um there you could probably use like epsom salt if you wanted to. But the sand is what I had here at my disposal so I just grabbed it and that's what I used. And it does give kind of that salty look
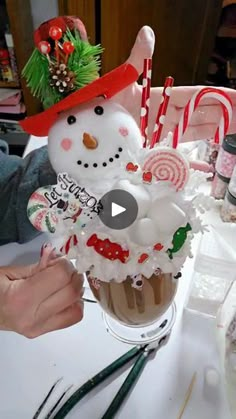
As requested several times, my hot cocoa tutorial! My best seller, and a favorite thing to make this time of year:) 🎄🍫☕️☃️ | By Christy's | Hey, guys. It's Christy coming to you with one of my most requested tutorials and this is the hot cocoa that I make. Every year, it's it's my best seller during the season and right now, I'm showing you how to make the dripping inside of the cup that we're going to be doing. So, I would just take some Modge Podge there and use some dark chocolate paint, acrylic paint. The one I'm using is melting chocolate and I just have a little bit mixed up here. This is the bowl that I usually have. You know, I mix up a so that I have some for the next time but I'm running low so I'm just showing you how I do it and so you're just going to take your cup that's obviously this cup is all dried and done already but I'm just showing you how it looks how it's supposed to look when you're done so I'm just taking a Popsicle stick and I'm just bringing it on the inside and then just letting it drip down just let it naturally drip down you don't have to like turn the cup or anything like that and you can put in as much or as little as you want. So with this step you are going to do this and then leave this dry overnight. There's a couple different steps to this tutorial. Now it's all dry. It's the next day. And now I'm showing you how I use my spackle. This is Red Devil one time lightweight spackle. And I'm using the same paint to mix with the spackle. And it's a little bit lighter now than the dripping and you can actually do it even lighter than that or you could do like a white spackle inside and then just have the chocolate dripping down but this is more like a hot cocoa and that's what I wanted to show you how to do So I'm just covering all the sides and excuse me. You want to make sure you don't have any spots showing through and what I do here is I just take a paint brush and I'm just trying to get the bottom covered really well. You just want to make sure there's nothing showing from the outside and the paint brush just kind of you know gets the excess off as you're getting it all covered. I just bring the paint brush all the way up on all the sides and make sure I don't have any excess spackle that is not need because you do not want to make this super thick. You want a thinner coat on the inside. So now you're going to wait and let this dry overnight. So this will be your second night. And now I'm just using the cardboard. I cut out a circle for the top of the cup. And I'm just hot gluing it on. So the next step we're going to do is the dripping. So you want to do this next. You don't want to have to do the dripping after your topper's on. So I'm just using some sprinkles called hot cocoa by Sue with the Primitive Pumpkin on Itsy. And they're appropriate sprinkles because there's chocolate and there are cinnamon sticks in there and peppermints. It's a really cute mix and there's a ton of snowflakes. All different sizes. And now I didn't want to go overboard on the dripping because we already have the chocolate dripping. But I just wanted to have a little bit of a white coming down. So I'm not covering up you know a lot of the chocolate. And there are some really big pieces of like a peppermint. And then I'm just putting a couple of those on. And you don't want to go overboard because with that fabric paint that I put on it will continually drop down if if there's too many sprinkles. And if you want to know what tool I'm using, it's just a wax tool for diamond art. And I got it on Amazon but you can find them just about anywhere. And I just use it for sprinkles. It works really well. Now, I'm putting on some chunky glitter by Primitive Pumpkin on Itsy and I just like to put a little shimmer on that while it's still wet And now I'm taking half of a styrofoam ball. Hot gluing it on on the low temp. And that is a two and a half inch ball. It just helps to take the place of spackle so you're not using so much of it. So I'm putting the spackle now. That same speckle inside my piping bag with a one M tip. Also I do add white paint to the speckle to make it a little less dry. So what I do is I just put a big amount of spackle into a Tupperware container and then I just add my white paint, my acrylic paint and just mix it up. The spackle I get is from Amazon. It is $25 right now for a gallon. But if you don't want to buy that much or you want to have a smaller amount. You could get the smaller sizes like at Home Depot and Lowe's. Uh Walmart I believe has a smaller a smaller container but it's not Red Devil and also Dollar Tree has little buckets of spackle too but you would need quite a bit for this project. So now I'm taking a snowman from the Dollar Tree and I'm just putting some toothpicks in the bottom of it so that it can adhere to the Styrofoam ball in the center and I'm just cutting this candy cane to make it a little bit smaller and that candy cane is also from the Dollar Tree. So it's kind of a budget friendly little project. Now I'm taking a skewer and I'm going to be putting in my straws. So the skewers are going to go right into the Styrofoam ball. Putting a little bit of hot glue inside each straw. Also I'd like to put the chunky glitter on before I decorate the whole thing because I don't want that chunky glitter on all of my little embellishments. Sometimes people put it put it on last. I just put it on beforehand. So now I'm just taking a snowflake from the Dollar Tree and just cutting it in half. And I'm going to position it where I think it should go. You can put a whole one into. I just I just like to have two halves in different areas. And be careful when you're working with this because of the dripping and the white dripping coming down. Just be mindful that it's there. Sometimes I bump into it. And I'm just taking a little fake peppermint candy from Hobby Lobby. Also putting in a toothpick so it adheres better. And now I just made some marshmallows out of white clay. And of course we have to have that for our hot cocoa. Again, more toothpaste. Okay in that sign that little let it snow sign is from Itsy. I'm not sure which shop it was. I had those from last year. And to make it more sturdy, I did put the toothpick on the back and glued that in. And there's another peppermint from Hobby Lobby. And I got some candy cavachons from Itsy. Again, I'm not sure where I have had a lot of this stuff last year and the year before. And now I'm just taking some little mittens. They're sprinkle mittens. And I'm just going to set them into the the spackle. Where it needs a little color. Adding a peppermint stick there. And more mittens. They're really cute. They come in blue too. I want to say play code three for those but I'm not sure. And adding some more candies in the back. You gotta finish up the back. Especially if it's going to be used like as a centerpiece. You want it decorated all the way around. And I had those little ornaments from Hobby Lobby as well. And I'm just adding some of the mittens in the back there. And one of the last steps is adding the dripping, the chocolate dripping and that is a dark brown puffy paint from Amazon. Also Hobby Lobby carries it to it. Well so does Walmart and any craft store. This is the dark brown. And I'm just dripping it down on the marshmallows and I'm just going to add just a couple snowflakes to the chocolate. I'm adding in a couple more peppermint sprinkles to the bare spots and it's almost done and the last thing we're going to need is a bow and I'm just using some ribbon from Dollar Tree. It has the snowflakes on them. And I'm going to make a four loop bow. And then I'm just taking some wire wrapping it around and tightening it and then I will be putting that right on the side of the glass there and I'm going to use the wire in the back to push through the speckle I'm debating which side it looks better. So I picked that side and I'm just pushing it through the spackle with that while you're in the back. And then I'm just taking a little fake snowball and putting that in the center of the bowl. And there we have it. I hope you guys enjoyed it and I'd love to see if you guys make one and if this inspires you. We will see you on the next one. Thanks for watching. Bye.
As requested several times, my hot cocoa tutorial! My best seller, and a favorite thing to make this time of year:) 🎄🍫☕️☃️ | By Christy's Faux Confections | Hey, guys. It's Christy coming to you with one of my most requested tutorials and this is the hot cocoa that I make. Every year, it's it's my best seller during the season and right now, I'm showing you how to make the dripping inside of the cup that we're going to be doing. So, I would just take some Modge Podge there and use some dark chocolate paint, acrylic paint. The one I'm using is melting chocolate and I just have a little bit mixed up here. This is the bowl that I usually have. You know, I mix up a so that I have some for the next time but I'm running low so I'm just showing you how I do it and so you're just going to take y
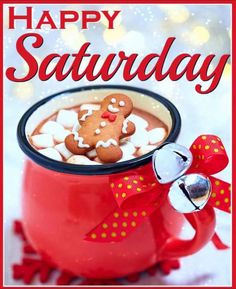
One of my first fake bake projects was a mug topper and I still sell a ton of them in my Etsy shop! They're perfect size for the top of your Rae Dunn... | By Jan | Facebook
One of my first fake bake projects was a mug topper and I still sell a ton of them in my Etsy shop! They're perfect size for the top of your Rae Dunn... | By Jan C's Designs | Facebook