How did you spend your Thursday night? Was it as educational as mine?
I spent last night getting a serious #history lesson on early #Gibson #flattop #acoustic #guitars from Gibson #historian and renowned #vintageguitar #repair and #restoration...

How did you spend your Thursday night? Was it as educational as mine?

I spent last night getting a serious #history lesson on early #Gibson #flattop #acoustic #guitars from Gibson #historian and renowned #vintageguitar #repair and #restoration authority, Mark Stutman (seen here demoing an early ‘30s “#tuxedo” #L00) the self-styled “Big Cheese” at the famous @folkwaymusic in #Waterloo, Canada.

Mark kept the shop open late and delivered an in depth presentation to a crowd of guitar nerds like me on the evolution of Gibson flat tops beginning with the late 20s #L1 (aka the “#RobertJohnson” guitar) through the Depression, pre-war and war years.

My key takeaway, and the thing that kinda blew my mind was hearing how quickly the designs changed in the early days as the #luthiers in #Kalamazoo struggled to build guitars that would not just fall apart. And how they were kind of “winging it” all the time…constantly varying stuff like wood thickness, brace design, shape and size, bridges, bridge plates, etc. etc. There was a lot less consistency in the design and build of these #guitars than I would have expected! A LOT less… 😂

#edumacation #vintagegibsons #vintageguitars #guitarphotography

kalamazoo repair luthiers waterloo vintagegibsons tuxedo guitarphotography edumacation historian flattop l00 vintageguitar restoration guitars l1 robertjohnson acoustic vintageguitars gibson history

Any advice from experienced #guitar #repair people would be appreciated…
I’m still digging the new 1972 #Gretsch #CountryGentleman from @capsulemusic, #Toronto, but I’ll have to do some emergency surgery on it: now that I finally figured out what all...

Any advice from experienced #guitar #repair people would be appreciated…

I’m still digging the new 1972 #Gretsch #CountryGentleman from @capsulemusic, #Toronto, but I’ll have to do some emergency surgery on it: now that I finally figured out what all the various switches and knobs do on it, I have realized that the #bridge #pickup has no output. I cleaned the #pickup #selector switch with #DeOXIt, but it had no effect. I’m hoping its a simple case of a wire that need to be #soldered rather than something more serious.

The tricky part is getting at that switch…there’s no access panel on the back…I’ll have to go in through the #fhole or, more likely I’ll take the #neck pickup out and go in through the rout…

#guitars #guitarphotography #gretschguitars #vintagegretsch #vintageguitars #guitarrepair #help #filtertron

toronto repair soldered neck bridge vintageguitars guitarphotography help fhole selector guitar pickup countrygentleman gretsch guitars filtertron guitarrepair vintagegretsch deoxit gretschguitars

1968 Telecaster with Marshal MA100C.

The amp belongs to my cousin, who actually got it in a private deal on Craigslist for a PRS SE guitar.  The Reverb doesn’t work so he asked me to take a look at it. I’m no tech, but apparently this is a common issue with this model…one of the wires in the reverb tank gets disconnected.  When I opened the tank up, sure enough, that was the issue.  Now I just have to figure out how to fix it.  the wires are totally insulated, so I am not sure if I can just take the insulation off and solder it…or if the insulation is required (once I remove it it ain’t going back on!)

vinatge fender telecaster 1968 blonde guitar my colllection marshall amplifier amp tube valve repair reverb guitar photography nikon

My 1968 Gibson SG Special,with my cousin’s Marshall MA100C.  He lent this amp to me to see if I could fix it…the reverb is not working.  Apparently this is/was a common issue with these amps.  I did not have the heart to tell him that… 

1) I am not nearly as “handy” as he thinks I am, and 

2) There is a high probability I will go in there looking for the reverb issue and end up irreversibly f*cking up something else completely and irreversibly! 

gibson marshall amp amplifier tube valve sg sg special vintage guitar electric guitar my collection toronto guitar photography nikon amp repair reverb repair

I call this shot “back to the drawing board”. This is my recently completed #Custom #DeeBeeCaster®. I had originally wired it like a modern #American #Standard #Telecaster, basically because I removed (i.e. “stole”) the entire wiring #harness on my...

I call this shot “back to the drawing board”. This is my recently completed #Custom #DeeBeeCaster®. I had originally wired it like a modern #American #Standard #Telecaster, basically because I removed (i.e. “stole”) the entire wiring #harness on my #fiesta #red Am Std. Then I decided to remove the purloined harness and replace it with a completely new harness which I then wired like the one I just removed…or so I thought… Until I realized that I somehow left the #tone knob out of the mix! So I have scrapped that attempt and am starting all over again from scratch using a wiring #diagram for a ‘66 #Tele I found in Dan #Erlewine’s book about guitar #repair. Wish me luck… :D

repair tone telecaster fiesta standard diagram american harness tele deebeecaster erlewine custom red

https://www.facebook.com/shyboytexrepairs
One of the things I most enjoy about living in Toronto is that eventually you will run into some famous musicians in the better shops around town. A few weeks ago I saw Dallas Green at The 12th Fret, for...

https://www.facebook.com/shyboytexrepairs

One of the things I most enjoy about living in Toronto is that eventually you will run into some famous musicians in the better shops around town.  A few weeks ago I saw Dallas Green at The 12th Fret, for example.

Now I’m a big fan of City and City and Colour, but this sighting is even more awesome…sadly it was not me that spotted him…but my friends at Shyboy & Tex Repairs (formerly the guitar repair and restoration department at the now-on-hiatus Capsule Music, Toronto).  They posted this to their Facebook page yesterday when they received a pair 1950s Fender amps for servicing.  OK, so they got some really old vintage Fender amps to work on…big whoop, right?

WRONG! These amps belong to Daniel Lanois!!  If you don’t know who Daniel Lanois is go and get U2s (best, IMO) album “The Unforgettable Fire) which was produced by Lanois and Brian Eno. And then go out and get "Joshua Tree”, and then go out and get “Achtung Baby”.  There are hundreds of others too…but you get the idea.  You can see more pics of Daniel’s amps on their Facebook Page here:

https://www.facebook.com/shyboytexrepairs

I LOVE  this guy!  His album “For the Beauty of Wynona” (1993) is in my top 5 favourite albums in the whole of forever!

Here’s a nice tune from that record…

And another…

And ANOTHER…

daniel lanois hamilton toronto u2 shyboy and tex repairs shyboy tex amplifiers fender vintage tube valvle deluxe for the beauty of wynona repair guitar shop amp porn acadie jolie louise unforgetable fire joshua tree achtung baby producer singer musician canada les paul lap steel goldtop

You know that sinking feeling when you take apart your tuner to see why there is so much resistance (not the electrical type, but the physical type) when you plug a ¼" cable into the input and output jacks, and so you pull it all apart but then you can’t find anything wrong, so you go to put it back together, but then you realize you don’t remember how to do that??  So you try…and it doesn’t fit properly and you have all these leftover pieces (“wait…there’s 3 screws and a round plastic thing leftover…that can’t be right can it??”)  so you try it again another way, and figure if there’s any pieces left over this time you will just throw them in the tool box for “a later date when (I) have more time to play around and figure this sh*t out properly”, and luckily, despite the missing pieces, it seems to work although you still can’t plug the ¼" jack in very easily but what the hell…I mean how often do you really need to unplug and re-plug that jack anyway?  Not very often, that’s for sure!  It’d be different if you were still a gigging musician, but these days you just play for fun at home, so there is virtually no impetus to tear down your gear all the time…well except when you have visitors and you want to de-clutter the place and move some of your gear down to the basement and throw it on the pile of gear that has been growing and evolving into more of a mountain lately thanks to a plethora of recent guest visits (who knew you was so popular??), but anyway it doesn’t happen enough to make a material difference whether or not the Peterson tuner is easy or difficult to plug a jack into and let’s face it, if you ever do really need to fix it, you’ll always have the left over parts safely stowed in the tool box along with the other few dozen left over parts from previous little maintenance projects gone more or less awry…

peterson tuner guitar electric guitar gibson es-335 diy fix repair oops guitar photography my collection toronto macro photography nikon d600 stupidity

Guitar repair update #1:  SG with a gap between treble-side fret ends and the binding.   (See original post here

I had the treble strings of my new white SG Classic to fix some gaps in between the fret ends and the binding (which actually rises up to cover off the end of the fret).  usually this binding is…well…bound to the end of the fret, but in this case they had separated and every time I even slightly bent the high E string it would catch in the gap and the note would be choked out.

Thanks to multiple Tumblr friends who are either pro guitar techs, or knowledgeable amateurs (and even some not so knowledgeable amatuers!) I received a ton of great suggestions on how to repair this little issue.  No doubt many of them would have worked well, but the winning suggestion came from Phil Clark (aka http://guitaromnivore.tumblr.com/).   Phil’s suggestion was (and I quote…)

“2-3 of drops of thin super glue into gap with plastic tooth pick. Push the binding towards fret with eraser end of a pencil. While still holding the binding flush,spray with glue accelerator. Clean up with razor blade.This is a less than a minute job”

And it was!  And it worked!  Thanks Phil!  And thanks to everyone else for the suggestions too (I hope I haven’t missed anyone who contributed advice, but if I have, please accept my apologies!):

Thanks for helping me out with this one my friends!

gibson sg sg classic sg special polaris white conversion guitar electric guitar p-90 pickups repair guitar repair my collection toronto frets binding phil clark guitar repair guitaromnivore macro macro photography guitar photography nikon d600 thank you

Another day…another #guitar #repair! Here’s my #vintage #1968 #Fender #Telecaster. Its #volume #pot delivers only 2 variable resistances… “on” and “off”! Not sure if that’s a fixable issue or if I have to replace the 46 year old pot. Hopefully I can...

Another day…another #guitar #repair! Here’s my #vintage #1968 #Fender #Telecaster. Its #volume #pot delivers only 2 variable resistances… “on” and “off”! Not sure if that’s a fixable issue or if I have to replace the 46 year old pot. Hopefully I can fix it (maybe clean it with that DeoxIT stuff)…wish me luck! :

volume repair 1968 telecaster vintage fender guitar pot

Calling all guitar techs (especially those who don’t mind giving free advice! ;) See that tiny gap between the end of the fret and the binding? All I have to do is a moderate vibrato on the high e string, and it slips right into this gap and gets...

Calling all guitar techs (especially those who don’t mind giving free advice! ;) See that tiny gap between the end of the fret and the binding? All I have to do is a moderate vibrato on the high e string, and it slips right into this gap and gets choked. It happens at every fret from 2 up to about 12. How would you fix this? Anyone have (free!) advice for me?? :D #guitar #repair #fret #tang #binding #gap #choke #gibson #sg #wtf? #help #thanks!

repair help tang sg binding choke gap guitar thanks wtf gibson fret

Well, apparently it’s snowing again.  WTF nature?!?

Also, I decided to shim the neck on my 1968 Telecaster.  The action was high, not crazy-high, but I like it a little lower and since the saddles were about as low as they could go, and the neck relief was acceptable, I figured I would add a bit of “angle” to the neck.  It worked well…but I may add a slightly thicker shim to bring it down a tiny bit more…

Also: when shim-ing, it’s fun to use personalized shims!  :D

fender telecaster vintage guitar electric guitar my collection 1968 blonde 68 shim neck macro original photography nikon d600 repair maintenance diy

If you were ever wondering what a $150 order from Stew Mac looks like…here it is!

In the first photo, you can see we have (roughly from left to right) a small bag alligator clips, used for drawing excess heat away from delicate electronic components during soldering.    Just above the alligator clips, we have some weird stuff that apparently “wicks” away the old solder from a connection, so you can add new fresh solder and get a nice clean connection.

Just to the right of the solder wick, is a special ruler used for determining the correct string spacing when you are cutting slots in a nut.  I am planning to use it to help me cut accurate and properly spaced notches in my new compensated bridge, recently installed on the 1968 SG Special.

Just above the string spacing ruler (and difficult to see in its plastic bag!) is a new 500k push/pull pot which I am hoping will fit my cousin’s Gibson Blues Hawk.  The original push/pull pot failed, and it seems to be an odd diameter shaft…and I was not able to find a similar one in the guitar shops around town, and had to order this one.  Fingers crossed…

Fanned out along the lower edge of photo 1, are some gauged nut slotting files…which I am also hoping to use in the cutting of the saddle notches on the SG Special’s new bridge.

The guitar is of course my 2005 ES-335 VOS, which you have seen MANY times here before ;)

Strap, as always, by Jaykco! 

gibson es es-335 vos sg sg special vintage nut bridge saddles tools diy project repair guitar electric guitar my collection toronto stewart macdonald stewmac files strings original photographers photographers on tumblr nikon d3000 lightroom

See folks?  This is why it’s good to know people!  Especially qualified and talented guitar techs!

A short time ago the B string on my 1961 Les Paul Junior started buzzing like crazy.  Regardless of which fret I played…and even when the string was played open…the buzzing was just awful!  It sounded - no exaggeration - like a sitar!  All the way up the neck…

I checked the neck relief -  it was fine.  I checked the neck for straightness…no issues.  I raised the action.  No result.  The nut looked ok too.  And the fets were also good.  

So WTF was going on?  It was only the B string, and it was so bad I could no longer enjoy playing the guitar at all.

As a last resort (or more accurately…as a last resort before spending any money!) I asked my friend Mike (of Mike & Mike’s Guitar Bar in Seattle, WA) for advice.

Mike immediately pointed me in a direction I had not considered:  the saddle.  See, I had replaced the stock “lightning bolt” compensated bridge with a newfangled one from Allparts compensated for a plain G (the stock bridge is compensated for a wound G).  I never, in a million years, would think a brand new bridge could be the source of the problem…so I didn’t even look at it!   

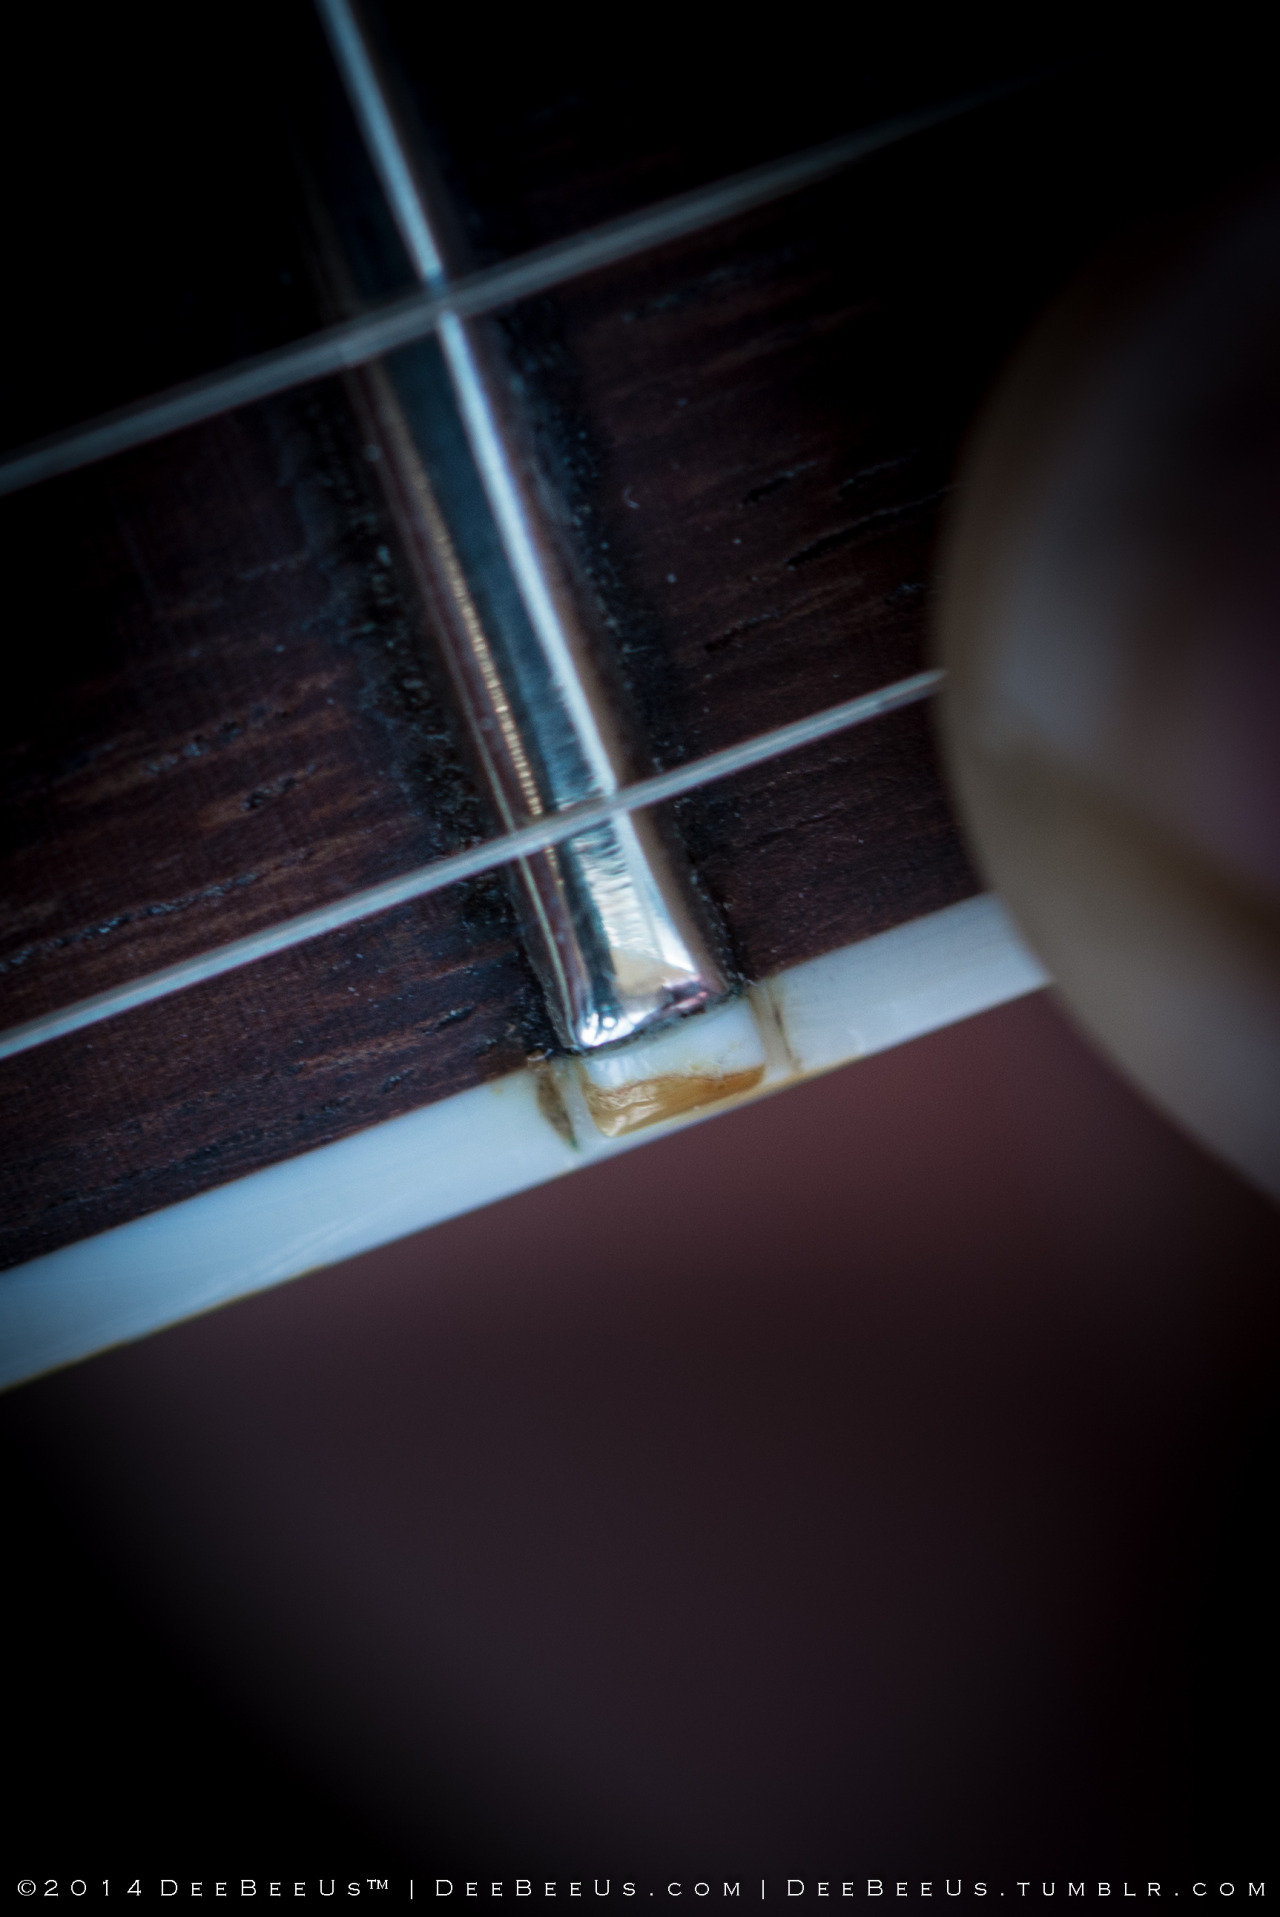
When Mike replied with “it’s gotta be your bridge” I took a closer look at it and found something fascinating.  Something, as a relative newcomer to wrap-around tailpieces, that I have never encountered before.  The winding around the ball end of the string was way longer on the offending string than on the other strings.  So long, in fact, that it rode most of the way up the wrap-around bridge…almost all the way to the saddle (see photo #5… compare the windings around the B to the high E and G…see what I mean?).  This was causing the string to make a couple of different contacts with the bridge/saddle….exactly what Mike said to look for!

So, what was the solution?  A new B string.  That’s it.  As soon I as I installed one, the sitar-like annoying buzz disappeared completely.  Thank you Mike!

Whenever I get technical “asks” above my capabilities (and most of them are!) I direct people to Mike & Mike’s Guitar Bar for expert advice.   Mike is extremely knowledgeable…and never seems to mind sharing his knowledge.  He is good people, my friends.  If you have not already done so, please check out his Tumblr, and give him a follow.  Or better yet, visit his eBay store and buy a little something for yourself…or a loved one!

Thanks again, MIke! 

http://mmguitarbar.tumblr.com/

http://stores.ebay.com/mikeandmikesguitarbar

mmguitarbar mike and mike seattle guitar bar guitar shop tech guitar repair vintage gibson sg les paul junior strings buzz sitar repair fix advice help thank you guitar electric guitar my collection toronto photographers on original photography nikon d200 d3000 macro

I am about to use a  care care product to revitalize the badly hazed and checked finish on my 1968 SG Special.  Meguiar’s #2 and #9.

I’ll let you know how it goes in the near future.  If it works well…you will see photos of the improvement.  If not, then I will never speak of it again!

You:  How did it go trying to repair the finish on your 1968 SG Special? 

Me:  1968 SG Special?  I own no such guitar.  I know not of what you speak!

gibson sg sg special vintage guitar electric gutar my collection restoration finsih meguiars rubbing compound repair buffing lacquer nitro nitrocellulose fix photography nikon d200 toronto


Indy Theme by Safe As Milk